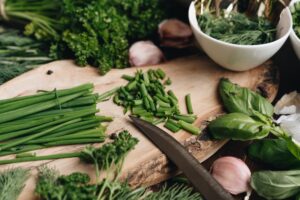
10 most Popular Herbs

Growing The 10 Most Popular Herbs of 2024 Organically
Introduction: Explore a our guide on what chickens can eat and why, their benefits, and feeding tips to keep your flock healthy and thriving.
A Guide for Garden Enthusiasts
Welcome to the world of organic herb gardening! Whether you’re a seasoned gardener or a novice, growing herbs organically from seed is a rewarding experience. This guide will walk you through the steps to cultivate the 10 most popular herbs of 2024: Basil, Parsley, Rosemary, Thyme, Oregano, Cilantro, Mint, Sage, Dill, and Chives. Let’s embark on a green journey to bring these flavorsome herbs to your garden!
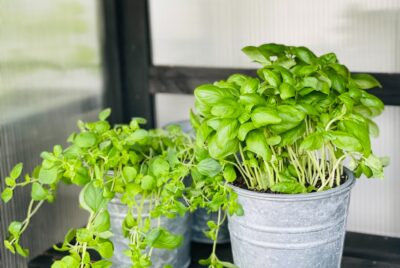
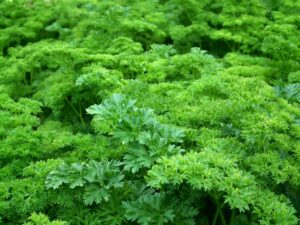
1. BASIL:
One of the 10 Most Popular Herbs
Growing Basil Organically from Seed
Starting Seeds Indoors: To ensure a head start, begin sowing basil seeds indoors about 6 to 8 weeks before the last expected frost. Select a high-quality, organic seed-starting mix and fill small pots or trays. Scatter the seeds evenly across the soil surface and cover them with a thin layer of soil, as basil seeds require light to germinate effectively. Keep the soil consistently moist but not waterlogged. Placing the pots in a warm area and covering them with plastic wrap can create a greenhouse effect, speeding up germination.
Light and Temperature:
Basil seedlings need plenty of light. Place them near a sunny window or under grow lights for 6-8 hours per day. The ideal germination temperature for basil is between 70-75°F. Once seedlings emerge, maintain similar temperature conditions for optimal growth.
Transplanting to the Garden:
After the seedlings have developed a few sets of true leaves and the threat of frost has passed, it’s time to transplant them outdoors. Choose a location in your garden that receives full sunlight for at least 6 hours a day. Basil thrives in well-drained, nutrient-rich soil. Gently acclimatize the plants to outdoor conditions over a week to prevent shock.
Soil Preparation and Planting:
Prepare the garden soil by incorporating organic compost to add nutrients. Space the basil plants about 12-18 inches apart to allow for adequate air circulation. Planting basil near tomatoes can be beneficial as they are complementary companions.
Ongoing Care:
Regular watering is crucial, especially during dry spells. However, avoid overwatering as basil does not like to sit in wet soil. A layer of organic mulch around the plants can help retain moisture and suppress weeds. Pinch off the tips of the basil as it grows to encourage bushier plants and prevent early flowering. If flowers do appear, remove them promptly to prolong leaf production
2. PARSLEY:
Seed Germination: One of the 10 Most Popular Herbs –
Parsley, known for its longer germination period, requires some patience. Start by soaking the seeds overnight in water to expedite sprouting. This softens the seed coat, making it easier for the embryo to break through. After soaking, plant the seeds in a seed-starting mix. Choose shallow trays or small pots and lightly cover the seeds with soil. Parsley seeds do not require deep planting; a light covering is sufficient to provide the darkness they need while still allowing easy emergence of seedlings.
Optimal Conditions for Germination:
Parsley seeds germinate best in temperatures between 60°F and 70°F. Keep the soil consistently moist but not waterlogged. Germination can take anywhere from 2 to 6 weeks, so patience is key. Providing a stable environment with indirect light will help encourage sprouting.
Transplanting Seedlings: Once the parsley seedlings have developed a few true leaves and are sturdy enough, it’s time to transplant them outdoors. The ideal time for transplanting is after the danger of frost has passed. Choose a garden location that offers partial to full sunlight, as parsley grows well in both conditions. The soil should be rich and moist, with good drainage to prevent waterlogging.
Soil Preparation and Planting:
Prepare the garden soil by mixing in organic compost to enrich it. This will provide the necessary nutrients for the parsley plants. Space the seedlings about 6 to 8 inches apart to allow enough room for growth. If planting in containers, ensure they have adequate drainage and are deep enough to accommodate the roots.
Watering and Maintenance:
Parsley prefers consistently moist soil, so regular watering is essential, especially in dry conditions. However, be cautious of overwatering, as this can lead to root rot. Mulching around the plants can help retain soil moisture and reduce the frequency of watering. Although parsley benefits from the nutrients in organic compost, it doesn’t require much additional fertilizer. Too much fertilizer can actually harm the delicate flavor of the leaves.
Harvesting Parsley:
You can begin harvesting parsley when the plant has several sets of leaves. Harvest from the outer portions of the plant to encourage continued growth. Cutting off entire stalks is the best method, as this stimulates new growth from the base. Regular harvesting will keep the plant producing fresh leaves throughout the season.
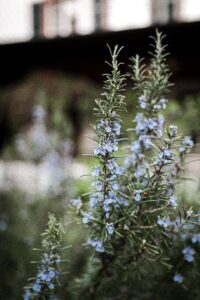
3. ROSEMARY: One of the 10 Most Popular Herbs
Seed Germination:
Rosemary is notoriously slow and less reliable to germinate from seed, but with patience and care, it’s certainly achievable. Start by planting the seeds in a well-draining seed-starting mix. Cover the seeds lightly with soil, as they need some light to germinate. Keep the soil moist but not waterlogged, and maintain a temperature of around 70°F for optimal germination. Be patient, as rosemary can take up to 3-4 weeks to sprout.
Preparing for Transplanting:
Once the seedlings have grown strong enough and have several sets of true leaves, prepare them for outdoor living. Ensure the threat of frost has passed before you consider moving them outside. Rosemary thrives in full sunlight and well-drained soil. Acclimate the seedlings gradually to outdoor conditions over a week to reduce transplant shock.
Planting in the Garden or Containers: Choose a sunny spot in your garden with well-draining soil. Rosemary prefers a slightly alkaline pH. If planting in containers, ensure they have good drainage holes and use a potting mix designed for herbs or succulents. Space the plants about 2 to 3 feet apart to accommodate their growth.
Care and Maintenance:
Once established, rosemary is quite drought tolerant and needs little water. Overwatering can lead to root rot, so let the soil dry out between waterings. Rosemary generally doesn’t require much fertilizer, but a light application of an organic, balanced fertilizer in the spring can promote growth. Prune regularly to encourage bushy growth and prevent the plant from becoming too woody.
Harvesting:
You can begin to lightly harvest rosemary once the plant is established and has shown good growth. Always leave enough foliage for the plant to continue thriving. Regular trimming can actually help the plant grow fuller and bushier.
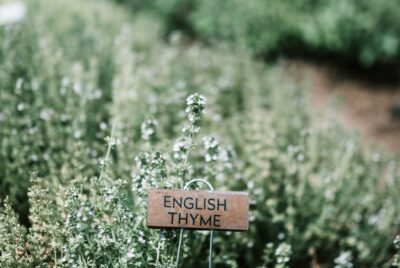
4. THYME:
One of the 10 Most Popular Herbs
Seed Sowing:
Begin your thyme cultivation journey by sowing seeds indoors. Use a well-draining soil mix in small pots or seed trays. Thyme seeds are tiny, so sprinkle them lightly over the soil surface without covering them deeply, as they need light to germinate. Keep the soil lightly moist but be careful not to overwater, as thyme seeds are prone to rotting in excessively wet soil. A warm, sunny spot or under a grow light will help maintain the right conditions for germination, which can take between 2-3 weeks.
Transplanting Seedlings:
After the risk of frost has passed and your thyme seedlings have grown sturdy enough, they are ready to be moved outdoors. Choose a spot in your garden that receives full sun, as thyme thrives in plenty of light. The soil should be well-drained, as thyme does not like to sit in wet conditions. Gently transplant the seedlings, spacing them about 9 to 12 inches apart to allow for spreading.
Growing Tips and Maintenance: Once established, thyme is relatively low maintenance. It is a drought-tolerant herb and requires minimal watering. Wait until the soil is dry before watering again. Overwatering can harm the plant more than underwatering. Thyme typically does not require additional fertilizer, especially if grown in rich soil. However, a light application of organic compost at the beginning of the growing season can give the plants a good start.
Pruning and Harvesting: Regular pruning is beneficial for thyme, encouraging a bushier growth habit and preventing the plant from becoming too woody. Begin harvesting thyme as soon as the plant has enough foliage to sustain growth. Snip off the sprigs or leaves as needed, but never take more than a third of the plant at a time. This practice will ensure continuous growth and supply throughout the season.
5. OREGANO:
Starting Indoors: One of the 10 Most Popular Herbs
Kickstart your oregano cultivation by sowing seeds indoors in a light, well-draining soil mix. Fill small pots or seed trays with the mix and gently scatter the oregano seeds on top. Since oregano seeds require light to germinate, press them lightly into the soil without covering them. Keep the soil consistently moist, but avoid overwatering to prevent seed rot. A bright spot or a grow light can provide the necessary warmth and light for germination, which typically occurs within 7 to 14 days.
Germination Care:
Oregano seeds need a stable environment with temperatures around 70°F for optimal germination. Ensure the seedlings receive plenty of indirect light and maintain a steady moisture level in the soil. As they grow, rotate the pots to ensure even growth on all sides.
Transplanting Seedlings: After the danger of frost has passed and your seedlings are sturdy, they’re ready for outdoor transplanting. Oregano loves the sun and thrives in well-drained soil. Choose a spot in your garden that receives full sunlight for the majority of the day. Space the plants about 10 to 12 inches apart, as oregano tends to spread.
Soil Preparation and Planting: Enrich the garden soil with organic compost before planting to provide nutrients. If using containers, ensure good drainage to prevent waterlogged roots.
Regular Care and Watering: Once established, oregano is fairly drought-resistant and requires moderate watering. Let the soil dry out between watering sessions. Water deeply when the soil feels dry to the touch but avoid overwatering.
Pruning for Growth: Regular trimming of the oregano plants will encourage a fuller, bushier growth. Pinch off or cut the tips of the stems, especially when the plant starts to produce flower buds. This will promote more leaf growth and prevent the plant from becoming leggy.
Harvesting Tips: Harvest oregano leaves as needed, preferably before the plant flowers for the best flavor. Cutting the stems just above a leaf node will encourage new growth. To dry oregano, hang the cut stems in a warm, dry place away from direct sunlight.
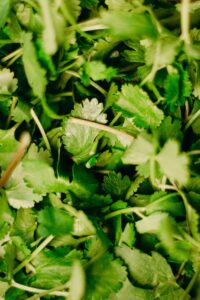
6. CILANTRO:
Growing and Harvesting Fresh Herbs – One of the 10 Most Popular Herbs
Direct Sowing:
Cilantro, also known as coriander, is best sown directly in the garden as it does not transplant well. The ideal time for sowing is just after the last frost date in your area. Select a spot with well-draining soil and sow the seeds about 1/4 inch deep, spacing them a few inches apart. Cilantro seeds are unique as each seed pod typically contains two to three seeds, so thin the seedlings to about 6 inches apart once they’ve germinated and grown a bit.
Optimal Growing Conditions:
Cilantro prefers cooler temperatures and may bolt (flower prematurely) in hot weather. If you live in a region with hot summers, choose a planting site that gets partial shade, especially during the afternoon. This will help prolong the leaf production period. In cooler climates, cilantro can enjoy full sun.
Soil and Watering:
The soil should be kept consistently moist but not waterlogged. Cilantro has shallow roots and benefits from regular watering, especially during dry periods. Mulching around the plants can help retain moisture and regulate soil temperature.
Fertilizing and Care:
While cilantro isn’t a heavy feeder, an application of a balanced, organic fertilizer or compost at the time of planting can promote healthy growth. Avoid over-fertilizing, as this can lead to more foliage at the expense of flavor.
Harvesting Tips:
Begin harvesting cilantro leaves once the plants are 6-8 inches tall. Cut the outer leaves first, leaving the central growth intact to encourage further production. Regular harvesting can delay bolting, but as temperatures rise, cilantro will naturally start to flower. Allow some plants to flower and set seed if you wish to collect coriander seeds or encourage self-seeding in the garden.
Dealing with Bolting:
If plants begin to bolt, you can either harvest the remaining leaves and remove the plant or let it flower. The flowers attract beneficial insects and, following flowering, the plant will produce coriander seeds.
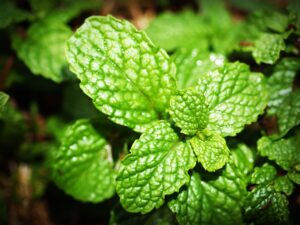
7. MINT:
An Easy-to-Grow Herb for Every Garden – One of the 10 Most Popular Herbs
Seed Germination:
Mint seeds, known for their small size, require a bit of care during germination. Start by sowing the seeds indoors in a tray filled with a moist, rich soil mix. Spread the seeds evenly across the soil surface and press them gently into the soil without covering them, as they need light to germinate. Keep the soil consistently moist but be cautious of overwatering, as this can lead to seed rot. Placing the tray in a warm area or under grow lights can facilitate germination, which usually takes 10-15 days.
Preparing Seedlings for Transplant:
Once the mint seedlings have sprouted and grown a few sets of true leaves, they are ready for transplanting. If planting outdoors, wait until the risk of frost has passed. Mint thrives in partial shade to full sun environments. However, in hotter climates, some afternoon shade is beneficial.
Garden Planting:
Mint is known for its invasive nature, spreading rapidly through runners. To control its spread, consider planting it in containers or using barriers in the ground. Whether in pots or in the ground, ensure the soil is rich and retains moisture well.
Soil and Watering:
Mint prefers consistently moist soil. Regular watering is essential, especially in dry conditions, but avoid waterlogging the soil. A layer of organic mulch can help retain moisture and suppress weed growth.
Maintenance and Pruning:
Regular pruning is key to maintaining a healthy, bushy mint plant. Trim the tops and remove any leggy stems to encourage fuller growth. This will also help prevent the plant from flowering, which can reduce leaf flavor.
Harvesting Tips:
Begin harvesting mint leaves once the plant has become established and has plenty of foliage. Frequent harvesting or pruning encourages the plant to grow more leaves. You can harvest mint leaves at any time, but they are most flavorful when picked in the morning.
Companion Planting and Benefits:
Mint is a great companion plant in the garden, as it can deter pests. It’s also a wonderful culinary herb, perfect for teas, desserts, and savory dishes.
8. SAGE:
Growing and Caring for This Aromatic Herb – One of the 10 Most Popular Herbs
Starting Sage Seeds:
To grow sage, start with sowing the seeds indoors. Sage seeds require a well-draining soil mix to prevent waterlogging and root rot. Plant the seeds in small pots or seed trays, barely covering them with soil as they need light for germination. Place the pots in a bright area but out of direct sunlight, ensuring they receive plenty of indirect light. Keep the soil evenly moist but not wet. Germination can take up to 2-3 weeks, so patience is needed.

Temperature and Light Conditions:
The ideal germination temperature for sage is around 65-70°F. Once the seedlings sprout, ensure they get at least 6 hours of light daily. If natural light is insufficient, supplement with grow lights to promote strong and healthy growth.
Transplanting Seedlings:
When the seedlings have developed several sets of true leaves and all danger of frost has passed, it’s time to transplant them outdoors. Sage thrives in full sun and well-drained soil. Choose a sunny spot in your garden where the plants will receive ample sunlight throughout the day.
Planting in the Garden:
Prepare the soil by loosening it and mixing in some organic compost for added nutrients. However, sage doesn’t require highly fertile soil and can do well in moderate conditions. When planting, space the sage plants about 18-24 inches apart to provide enough room for growth.
Watering and General Care:
Sage prefers somewhat dry conditions and is drought-tolerant once established. Water the plants deeply but infrequently, allowing the soil to dry out between waterings. Overwatering can harm the plant, so ensure the soil is dry to the touch before watering again.
Pruning and Maintenance:
Regular pruning is beneficial for sage, promoting bushier growth and preventing the plant from becoming leggy. Trim back the sage plants in spring to encourage new growth. Removing flowers as they appear can also help maintain the plant’s energy in leaf production, although the flowers are edible and attractive to pollinators.
Harvesting:
Harvest sage leaves as needed, cutting them in the morning when their essential oils are strongest. For drying, harvest sage before it flowers for the best flavor.
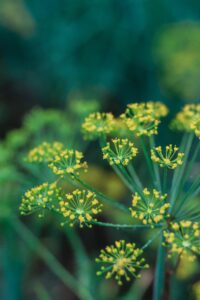
9. DILL:
Planting, Growing, and Caring for this Versatile Herb: One of the 10 Most Popular Herbs
Direct Seeding:
Dill grows most effectively when its seeds are sown directly into the garden. This approach is preferred as dill has a delicate root system that doesn’t respond well to transplanting. Choose a spot in your garden where the dill can remain undisturbed. Plant the seeds in well-drained, fertile soil, placing them about 1/4 inch deep. You can scatter the seeds and lightly rake the soil over them. Dill seeds typically germinate within 7-14 days.
Optimal Growing Conditions:
Dill loves sunlight, so find a location that receives at least 6-8 hours of direct sunlight daily. It can grow quite tall – up to 3 feet or more – so choose a spot where it won’t shade other sun-loving plants. In areas with strong winds, you might need to stake the plants to prevent them from falling over.
Soil and Watering:
While dill isn’t particularly demanding regarding soil quality, it does prefer a slightly acidic to neutral pH. The soil should be moist but well-drained, as dill does not like sitting in waterlogged soil. Regular watering is crucial during the initial growth period. Once established, dill is somewhat drought-tolerant, but consistent moisture will produce the best foliage and flavor.
Fertilizing and Care:
Dill isn’t a heavy feeder, so it doesn’t require much fertilizer, especially if planted in decent soil. If desired, a light application of a balanced organic fertilizer at the time of planting can be beneficial. Be careful not to over-fertilize, as this can lead to excessive foliage growth at the expense of flavor.
Pruning and Maintenance:
While not strictly necessary, pruning dill can encourage bushier growth. Pinch off the top of the central stem once the plant reaches about 8 inches in height. This action stimulates the growth of lateral branches.
Harvesting:
You can start harvesting dill leaves once the plant has several sets of leaves. Snip the leaves or whole stems as needed. For the most intense flavor, harvest in the morning when essential oil concentrations are highest. If you wish to harvest dill seeds, wait until the flowers have bloomed and the seeds begin to turn brown.
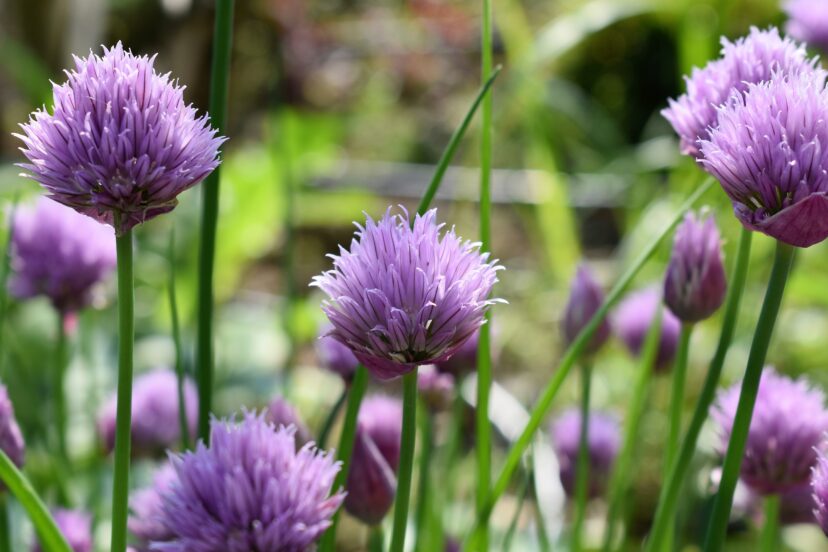
10. CHIVES:
One of the 10 Most Popular Herbs
Growing and Nurturing for a Flavorful Harvest
Indoor Start:
Initiating the growth of chives indoors is a great way to get a head start on the growing season. Sow chive seeds in a tray using a well-draining soil mix, which is crucial to prevent waterlogging and root rot. Since chives require light for optimal germination, sprinkle the seeds lightly over the soil without covering them too deeply. Place the tray in an area that receives plenty of indirect sunlight or under a grow light. Keep the soil consistently moist, but be careful not to overwater.
Germination Process:
Chive seeds generally germinate within 14-21 days. Maintain a steady temperature around 60-70°F to encourage sprouting. Rotate the tray periodically to ensure even exposure to light, promoting uniform growth.
Transplanting Seedlings:
Once the seedlings have grown strong enough and have a few sets of true leaves, they are ready to be transplanted outdoors. Transplanting should be done after the risk of frost has passed. Choose a sunny spot in your garden as chives thrive in full sun, although they can tolerate partial shade. The soil should be rich, moist, and well-drained to support their growth.
Planting in the Garden:
When transplanting, space the chive plants about 6 to 8 inches apart. This spacing allows for adequate air circulation and growth room. If planting in containers, ensure there is enough depth for root development and adequate drainage.
Watering and Maintenance:
Regular watering is key to keeping chives healthy, particularly in dry conditions. However, avoid overwatering, as chives do not like soggy soil. A layer of organic mulch can help retain moisture and suppress weeds. Chives are not heavy feeders, but an occasional light application of a balanced organic fertilizer can promote vigorous growth.
Harvesting and Pruning:
You can begin harvesting chive leaves once the plants are about 6 inches tall. Cut the leaves from the base of the plant to encourage new growth. Regular trimming also helps prevent the plants from becoming woody and stimulates the production of fresh, tender leaves. If you allow chives to flower, their purple blossoms are edible and can add color and a mild onion flavor to salads.
Chives as companions:
Chives are excellent companion plants in the garden, known for repelling pests and benefiting neighboring plants.